Pages

mai 10, 2015

1855 Peterson’s Stays

At the end of 2013, Marion from "Foundations Revealed" was looking for little hands to try some old corset patents.   I don't know why but I answered "pick me ! pick me !" I was given the 1855 Peterson's Stays and my article was published in February 2014. Now that time has past, I'm here to share it with you too.

 ═══════════════════════════════════════════════════════

This is the first time I have made something I won’t be wearing in the coming weeks for reenactment and it IS very strange to me but it has been a good adventure in my short corsetry life. This corset is my eleventh one and the fourth without commercial pattern, so I think I can say: quite a challenge! 
The pattern comes from Peterson’s Magazine, a middle- and upper-class Victorian women's home life magazine. This one, dated January 1855 and written by Emily H. May, proposed to have "a well-fitted corset made by every housewife or active woman who needs to move".


Here is the complete article.

I needed to read it several times because of my poor non-English speaking brain, but in the end, I understood that it’s a long corset, with no central opening but a wooden busk as on the 1800/1840’s corsets and a back-lacing closure. You can see there are very few boning channels drawn, just enough to keep the back straight between the bust gores and at the center front. Hips and bosom gores are wide, rounded and of a curving shape, moving towards the 1860’s shorter form. 
In brief, I would say it’s transitional between 40’s and 60’s and surely a comfortable corset.

Scaling up

Before anything else, I enlarged the pattern a little bit. This was both in order to be able to scotch-tape it and have a 3D vision of the shape with the inserted gores, and to be sure that B = hip gores and C = back gores.

It also allowed me to check the gores scale compared to the rest of the pattern, because at first sight they did not seem to fit and yet, except for bust gores, they do. How wonderful optical illusion is!

Seen from above
Seen from the side


On this model, we can see a very accentuated shape quite like the later corsets and it is hard to visualize the "long" side of the corset.


To enlarge the pattern, I used my printer and % scale. Before scotch-taping, I checked that the center back (CB) and center front (CF) had the same measurement on paper. So, basing myself on both paper and measuring of the actual extent of CF, I got a 255% enlargement coefficient.

Unlike many articles I have read on FR, I do not have Photoshop or other similar software, but I can handle a .jpg file in Windows Paint: File> Layout> Expand a xx%> ok. I then print in PDF, which allows me to print only the desired pages of the document (because there’s a lot of full blank pages).

Adjusting the pattern

Note: For taking measurements, after having tried to understand why it is necessary to "deduce 2 at the waist as an allowance for the clothes" (this can be understood) but why to add "4 inches for the clothes" in the length, I decided to do as I usually do and not to follow Peterson’s instructions.
My measurements:
  • Bust: 108cm (42.5’’) / Underbust: 90cm (35.4’’) / Waist: 93cm (36.6’’),
  • Gap Bust/Waist: 15cm, on which there are four bust gores to add,
  • Gap Underbust/Waist: 3cm.
Since it is possible for me to enlarge the front and back pieces based on the waist measurement, the other alterations will be made with gores.
I chose to have a lacing gap  of 7.5cm (3'') and a waist reduction of 6cm (2.4'').

My calculations for my 93cm waist measurement:

waist
½ waist (1)
Closing (2)
reduction (3)
Paper (4)
Gap to add (5)
cm
93
46.5
42.5
39.5
± 25
14.5 cm
inch
36.6
18.3
16.75
15.55
± 9.8
5.75 ‘’

(1)   ½ since the pattern is only half of the corset
(2)   ½ waist – ½ gap closing = 46.5 – (½ x 7.5) = 42.5
(3)   Gap closing – ½ reduction = 42.5 – (½ x 6) =
(4)   Waist measurements taken on the original pattern
(5)   Reduction – Paper = 39.5 – 25 = 14.5

Now I must divide 14.5cm between back and front pieces of the pattern. As there are only two parts and they are assembled on their side, I decided to add 7.25cm equally to each part.

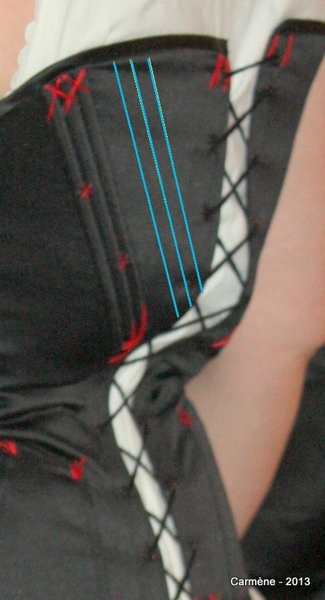
For the back, the insertion is easily done once, parallel to CB between the side and the gore (not moving the gore). For the front, insertion is done in the same way: parallel to CF between the side and the gore, but there I did it with three steps of 2.5cm (see picture below). With hindsight I wonder whether I could also not have done it at once.

in blue, the line to increase the pattern

It's time for the first test on Cunégonde, my dummy! Time for the first bit of stress as well, even if that it’s only paper, because you get to see rather quickly whether everything fits or not.
When I pin the CB keeping my gap closed, the CF is not in its place. I then I temporarily added the shaded part, as there is a seam in this place, but it will still be able to adjust if necessary.

Pattern pieces enlarged with front adding
The gores are not yet open so it’s a bit tight, but we can already say that:

  • No side boning: it creases! In front, there will be a bone so no worries, but on the side...
  • On the front, it seems a bit "floppy" on the belly...
1st mock-up and 1st vision of this unsightly crease on back side…

For the gores, I insert my pattern pieces (fabric or paper) behind my mock-up and redraw adjustments directly over :


Pinning and redrawing gores
The verdict of the first fitting was that I realized I was not totally convinced the bust gores were the right shape or size. I must say it’s difficult to make final adjustments without somebody's assistance on this kind of gore, so I decided to ask a friend of mine for help. But actually, my mistake was only due to my laziness: I had simply sewn gores on just half of my mock-up (so only two out of four bust gores...).

Having sewn the two other bust gores, it turned out they were perfect. On the other hand, an adjustment was needed on back gores, which were too big and badly placed. Unfortunately, the corset was already edge-to-edge, because I had been losing weight since I had started working on it. I decided I must amend my pattern again, so I removed on all the seams 0.5cm and 1cm on the mid back (what amounts to 5cm).

On the following pictures you can see:

  • In pink, the pattern pieces as originally printed,
  • Then, the first enlarged pieces/first alterations with the additional 7.25cm,
  • The final pieces with seam allowances (1.5cm), the new boning channels places, the back facing and in red, the last modifications.

Gores pieces: before and after

Front piece: before and after

Back piece: before and after

I'm always surprised, even taken aback, when I see these before / after pictures - and that's why I like them, because usually my pattern no longer has much to do with the original.
Well, it's time to sew now...

Construction and Finishing

I cut the corset in a single layer and assembled wrong side to wrong side, then lap seamed.

For the hip and back gores, I also used a lapped seam as the 'T' drawn on the pattern shows that the seam allowance of the gore slash is sufficient. On the other hand, for the bust gores, we can take only 5mm seam allowance so I have assembled them as normal.

Regarding the boning, I made a big change from the instructions in Peterson's Magazine. We’re asked to "drill a hole through the stay and the bone, about an inch and a half from the top and bottom of each bone, and fasten them in with silk, by bringing the needle through the hole to the right side, and passing it over the top of the bone"; thus it’s possible to remove the bones to clean the corset but it creates mini buttonholes that I find to be visually ungainly.

For my corset, I chose to cut the fabric on the straight grainline which will serve as bone casings on the wrong side (sewn wrong side to wrong side with 5mm of seam allowance). All the bones are German Plastic Bones 7mm wide, except the two CF diagonal bones which are 11mm wide.

For the CF busk, I didn’t have what’s required in the explanations, so again I made a large channel lapped seamed on the front side, this time on the right side of fabric. The busk is a sturdy wide steel boning of 20mm found at Sewcurvy.com.


Center Front busk channel

To sum up, I followed those steps to build the corset:


  • Sew two boning channels on CB and putting eyelets,
  • Sew back gores,
  • Sew hip gores,
  • Insert bust gores,
  • Sew side seam (lapped seam),
  • Sew boning channels in back, CF and bust,
  • Sew CF,
  • Sew CF busk channel,
  • Insert all bones,
  • To finish, sew a simple bias on both edges.

Xmas Bias Binding (you can see on the left the boning channel on the wrong side)
And then, I can begin to floss. This has been the first time I have attempted full flossing. Since I am running out of time to finish the corset, I will put pictures up as soon as I have finished!

Once again, Foundations Revealed is a true Bible:

Final Countdown


Tadaaaaa! Well, the front part which has not been flossed yet looks either very dark or empty... but it is rather not that bad, in my view, since I intended this corset to provide a silhouette of the right shape in order to wear the correct costume.

Impressions / what I learned

When Marion proposed this challenge on FB, my first reaction when I saw the pattern was "Doesn't seem so complicated..." ...and then there was confronting the reading... feeling disheartened... and sewing... But in the end, yes - this corset is (almost) as simple as it seems at first sight: gores fit almost on their own and as we saw, the other two pieces fit also very easily.

On the other hand, I realize that I took some liberties with this pattern in its realization. The more difficult part actually is not making the corset, but writing this first article.
As to the corset itself, it is very comfortable with so few bones; I feel maintained while not being completely stuck inside.

The drawback of this comfort is that famous unsightly crease on the side; if you want it to disappear you can add a vertical bone beside the side seam (no need to rely on a spiral bone in the side seam, I think).


If I had to do it again, I would make the gores differently, or more properly. I'd take more time, since this is only my third gored corset and I'm still struggling with these techniques. I would have especially wanted to manage the bust gores differently so that the inside would be clean, because now I'll have to cover them through with bias.

Here, again, I should have read this FR article beforehand.

Another point to review would be putting metal boning, at least in the CB (I didn’t have a long enough one at home), and / or moving the back diagonals bones which in this case are not doing their job; that is to remain flatly pressed against the top of the corset back. (I made the mistake of moving to the left / down instead of right / up, which seemed more logical.)

New placement of back diagonals bones

Last but not least, a piece of warning, even though it won't surprise anyone: never run this kind of project if you're on a diet!


juin 18, 2014

1883 Corset without gousset


One of the advantages of being unemployed is to have the time to get new techniques in more detail.

As I needed a new corset for my bustle dresses, I started looking for a pattern in my library, out of traditional Norah Waugh or Jill Salen, so I turned to Frances Grimble
again.

Her books
do not abound in underwear patterns, I went rather defeatist (eg I had looked for a 1910's corset pattern unsuccessfully) but delight I found two patterns of the 1880's : one with gussets and one without. Just to simplify my life with a minimum of adjustments, I chose the version without gusset.


Everything had well begun : in a little less than 1:30 am, I had enlarge my 6 pieces.

However, by finishing the last part,
the tragedy happened... I realized that I did not used the ruler from the "zero", but from the top edge, that means about one measure furthermore in every point...


So rebelote, taken back all the measures (fortunately rather quickly) to get to the blue lines on the above pattern
.

Much to my surprise (yes that still manages to surprise me !) the mock-up, mounted quicly and without bones, seems to go has almost perfection.


Thus,
I did not ask myself too many questions before I start cutting the fabric. It’s a pretty green silk with small motive tone on tone and a golden frame.
Explanations do not give much informations : "The corset has a front clasp and bakc lacing. A strip of material is set onto the seams lengthwise to hold three bones."

I wondered what to do and how:
- The fabric is very thin, should I line it or not?
- I wish to use felted seams as bone casings, it increases the strength and in my opinion gives a prettier rendering.


It was the 1st time I used spiral boning, for the 3 side seams. Certainly we gain comfort and movement, but on the other hand it was a bad adventure to insert them.
First, after 3 unsuccessful attempts and a finger pinching, I gave up the idea to put ending tips : either I'm not very good (what is possible) or there is a special technique to put them, but impossible to make them hold on my bones, nevertheless well flattened with pliers and just like I had seen on various Web sites.

The bias is hand-made, in an old one fabric, which luckily was in the good bronze shade.

A few hours and a few flossing work later, I was able to making a complete trying.


Remains to decide on a lace border. As I did not manage to decide, I asked my friends on FB, and the answer is unanimous: WITH!


I do not know you, but I, both pleased me in the end :)


mai 30, 2014

1906 Ball Gown

So sorry to have been silent for so long...

Here's an article to present my 1906 Ball Gown, made last year for the beautiful event Downton-sur-mer.
The pattern comes from a Frances Grimble's book using apportioning scale.

The first step was to scale up the pattern, really easy using the apportioning scale tools on the books.


I had only one little problem on skirt length, as you can see in the picture I had ton extend about 44cm (17").


I made my mock-up with an old sheet from my grandmother.

I decided to change the back closure onto a side closure, using a piece of hook and eye tape.
But I also need to find a solution for 2 things :
- how to sew the sleeve with the closure ?
- how to slip the bodice easily with the shoulder stripes ?


The sleeve
is sewn only in front side and once sliped, buttoned on the back.

The shoulder stripes are buttoned to the back too.


And then came the looong time for trimming ...
I cut out 2 yards of black lace and did a lot of tests to find the most lovely and delicate way to arrange it. It took me one week before I have finished hand-sewing all the lace, but I'm very satisfied with the result.


I let you enjoy some pictures in situ :)


September 2013, Trouville (France) : Downton-sur-Mer 1913
More pictures of this event :
Le P'tit Photographe part 1
Le P'tit Photographe part 2

A few weeks ago, we went to UK with friends ; this week end gave me a new occasion to wear the dress. We had diner on Bluebell Railway train in Sussex.


More pictures of the trip :
La Machine à recoudre le temps
Temps d'Elégance

mars 13, 2013

1909 Evening Dress - Janet Arnold (1st try)

I have been wanting for long to try and use Janet Arnold's book to make the "1909/1910 Evening Dress from the London Museum" (in "Patterns of Fashion 2 - c. 1860-1940").

I knew I making an attempt at something really hard for me, because the dress which is patterned is a small size, so I would have to make a lot of modifications to do, but I really wanted to try...
Well, now I think I shouldn't have ... It made me completly crazy and after hours of work, I decided to stop the project for the moment.


This is the beautiful drawing of the dress by J.Arnold.


It's a dress for an approximately 74cm (29") waist corseted women, so quite far from my measurments...


This is how the pattern looks like into the book.

The first step was to understand what all the parts were for and how they would match the bodice lining.

It took me some time but finally I went trough  with the great help of a friend of mine.


I used a printer to enlarge all the parts once (x800% considering the 1/8 scale of the book) and then I tried to ajust the underbodice parts. That's when my nightmare began ...
I knew what to do and how to do it, but nothing worked as planned so I stopped everything and tried something else, using the brassiere pattern of Festive Attire and after a long fight, the underbodice was done !

The next step was the drapped bodice and the sleeves parts.
Drapped bodice / undersleeve


As the drapped bodice is a round drapped part, it was quite easy to adjust. I added 1,5" on the center back (red line) and 3" on the back (red line).
That was a different kettle of fish with undersleeve part : as you can see I made 5 adjustements and was still not happy of the results.


Front skirt

So I decided to put the whole part above the waistline appart and started the skirt adjustements, far easier to me.
I only added a little bit in centers (front and back) and sides seams and I moved the front dart of 1", and a priori it's looked fine.


I say "a priori" because I was so dispirited that I didn't try to make a mokeup of the skirt...


Finaly,
after 2 weeks of a long work on this dress, I gave up... I don't need this dress for the moment (until September) so I will try again in a few months, I haven't said my last word !!  
I still have a lot to learn about patience... 


mars 03, 2013

Catherine the Great - Riding Habit

Here is my view of the "Russia and Catherine the Great" theme for Venice Carnival 2013.


I was looking for some uniform style, as I know that Catherine the Great loved this kind of dresses.
I found a "Catherine II's Uniform Dress Modelled after the Uniform of the Life-Guards Cavalry Regiment" picture on the State Hermitage Museum website.

Catherine II's uniform from the "State Hermitage Museum"

I really like :
- the blue and red blending
- the golden ribbons ornements
- the colar
I dislike :
- the length of the waistcoat
- the overdress (on the right picture)


I found the perfect matching color for the skirt, and 2 different shades of blue for the waiscoat :
- a coton steel blue (??) fabric (on the left)
- a watered dark blue fabric (Prussian blue I guess) , used on the wrong side (on the right)

The watered fabric should have been the main fabric and the coton, the lining.

But after I've sewn the waistcoat bodice in both fabrics, I finaly decided to switch.


After searching for hours at the flea market, I found a beautiful golden metallic ribbon and I tried differents patterns to match the quantity I bought (How mindless I was to bought only 5 meters... :x)


Nevertheless, I had a big problem with the skirt pattern. I don't know why I didn't make it with the pattern I usually use. The (bad) result is : the skirt is too short on the back (really !! the petticoat is visible) and the front pleats don't fall gracefully :/

Here, a picture from Venice to show you the completed project :


The beautiful lace jabot was made by Evelyne Bouchard (her blog in french : http://evelynebouchard.e-monsite.com)


You will find more pictures here : Clic !